
Category: Brands
When it comes to delicacy, strength, and unequalled performance in the tool request, there’s one name that stands out constantly: Kukko. With its German engineering superiority, Kukko has been producing high-quality pullers and dismantling tools for more than a century. Whether you’re a professional handyperson, a mastermind, or a do-it-yourselfer, Kukko tools are draughted to simplify your work, make it brisk, and make it more effective. In this blog, we’ll take a deep dive into the world of Kukko tools: what they are, what makes them unique, how they work, and why they’re trusted by professionals worldwide. What Is Kukko? Kukko is a commanding German manufacturer of pullers and dismantling tools. Innovated in 1919, the company has erected a strong character for creating innovative results for removing corridor-like gears, compartments, pulleys, and bushings without causing damage. The term “Kukko” is deduced from “Klein und Klauenlos,” the German language’s restatement for “clawless and small,” emphasising the original charge of the company to give tools with which mechanical factors could be uprooted without claws and physical force. moment, Kukko boasts a vast portfolio of products feeding to the requirements of diligence similar to Automotive form Mechanical engineering Electrical engineering Factory and ministry conservation What Makes Kukko Tools So Special? There are multitudinous tool brands available, yet Kukko still stands out due to its 1. German Engineering Precision Each Kukko tool is manufactured in Germany using top-quality accoutrements and rigorous quality control. This translates into outstanding continuity, a perfect finish, and silky smooth operation indeed under the most demanding conditions. 2. Innovation and Patented Designs Kukko has several patents for its innovative sculler designs. Slide hammers, tone-centring jaws, and malleable arms are some of the features that make their tools extremely effective and safe to use. 3. Non-Destructive junking Kukko tools are finagled to remove corridors without causing damage to them or other girding factors. This is particularly pivotal in diligence, where indeed minor damage can lead to precious repairs or reserves. 4. Modular Systems Most Kukko tools have a modular design, enabling druggies to assemble factors similar to arms, spindles, and jaws according to their requirements. This makes copying several complete sets less necessary. 5. Complete Accoutrements From the single sculler to a complete tool tackle, everything is available from Kukko. Their universal sets arrive with tidily packed boxes and comprehensive instructions. Types of Kukko Tools and Their Uses Kukko carries a wide selection of tools, but let’s sort out some of the crucial orders 1. External Scullers These tools hold the surface of an element (similar to a gear or bearing) to pull it off a shaft. They live in 2-jaw or 3-jaw designs and are used considerably in automotive and artificial operations. Typical Uses Removing compartments Pulling pulleys Disassembling gears 2. Internal Scullers These are constructed to pull from the inside out. They’re placed inside the element, expanded to fix the inner edges, and also prised the part. Common operations Pulling inner bearing races Disassembling bushings Pulling sleeves or tubes 3. Hydraulic Scullers For further demanding tasks, Kukko provides hydraulic performances of their scullers. Hydraulic pressure is used by these tools to apply force easily and strongly, minimising physical trouble. Advantages further force with lower trouble Suitable for heavy-duty use Precision-controlled disassembly 4. Separator Sets Also called bearing splitters, these sets are applied when corridors are too tightly seated for standard scullers. The division wedges beneath the part so that a tighter grip can be achieved. Uses Pulling tightly fitted compartments Pulling washers and bushings 5. Slide Hammer Scullers These scullers use a sliding hammer to induce impact force, salutary in tight or odd locales. Kukko slide hammers have gained popularity in small-scale machine repairs. Recommended for Removing shafts Loosening rusted or stuck fasteners 6. Accessories & Modular Systems Kukko also has a comprehensive variety of accessories, including Spindles Jaws Arms Cross-beams Extensions These can be paired to form substantiated configurations grounded on your work. Diligence Dependent on Kukko Tools Automobile Industry Kukko pullers are employed by mechanics for Pulling wedged capstans, gears, and pulleys Steering system form conservation of wheel comportments and dormancies Artificial conservation In shops and manufactories, Kukko tools are employed for conservation of ministry relief of worn-out corridor Avoiding outfit time-out Mechanical Engineering Engineers love Kukko for Breaking down prototypes Fixing artificial robots Working on CNC machines DIY and Home Repairs Advanced DIY suckers and potterers use Kukko for Fixing home appliances Maintaining bikes and motorbikes Repairing small ministry Stylish Kukko Products You Need to Know These are some of the most extensively used Kukko tools 1. Kukko 20-10 Universal Puller Set 2-arm or 3-arm setup Reversing jaws Ideal for garages and shops 2. Kukko 46 Internal Puller Set Specifically erected for comportments and bushings Includes slide hammer or counterstay options 3. Kukko 70—A Separator Set Wedges under tight corridor typically used with Kukko scullers 4. Kukko 128 Hydraulic Puller Heavy-duty operations Especially suitable for big compartments and press-fitted factors 5. Kukko-Set Tool Case One stop shop Comes with arms, jaws, spindles, etc. Advantages of Using Kukko Tools Let’s anatomize why experts love Kukko Long Lasting Designed to last times of heavy operation Accuracy Less damage to factors Ease of Use Easy-to-follow instructions and straightforward design Time-Saving Accelerates disassembly procedures Safe Lowers chance of part or stoner injury Modular malleable to varied operations Value for plutocrat High ROI for experts Kukko vs. Challengers Although other tool manufacturers have pullers, Kukko excels with 100 Made in Germany quality personalized technology Comprehensive selection of tools client-centric modular design Solid worldwide support and service Brands like GearWrench, OTC, and Facom also make quality tools, but Kukko’s focus on non-destructive dismantling and modular inflexibility frequently gives it the edge, especially in professional settings. Tips for Using Kukko Tools Effectively Choose the Right Tool Always match the tool to the task —don’t use a 3-jaw sculler when a division is demanded. Follow the Manual Kukko provides detailed operation attendants with plates. Use them! Apply Indeed Force Make sure jaws are

Worksite safety is perhaps the most critical element of any artificial, construction, or conservation shot. While safety helmets, harnesses, and safety shoes admit important hype, one significant safety advance that tends to be overlooked is tethered tools. These especially finagled tools save from injuries, damage, and precious detainments by keeping tools safely attached to workers or anchoring points. In this blog, we’ll detail what tethered tools are, how they serve, why they’re demanded, and how they enhance safety and effectiveness on job spots, particularly those at height. What Are Tethered Tools? Tethered tools are normal hand tools fitted with a tethering system to stop them from being dropped or lost. These tools are specifically made or redesigned to be worn on the user, their harness, tool belt, or some other anchor point through tethers, cords, or retractable rolls. The reason is straightforward but effective — to keep tools from falling, particularly when performing work in elevated positions or in situations where an object dropped could cause severe injury, outfit detriment, or time- eschewal. Why Dropped Tools Are So Dangerous Dropped tools are more dangerous than most individuals understand. also is why trouble of injury A small wrench that falls from 30 bases can induce severe injuries or indeed death. Property damage Fallen tools can ruin precious outfits, shatter glass, or destroy delicate instruments. conclusion of work When an existence is injured or an outfit is broken, work has to be stopped, losing time and capital. Loss of tools Indeed, if no bone is injured, fallen tools can end up in untouchable places, adding to the cost of relief. Predicated on occupational safety statistics, fallen objects rank as one of the leading sources of injuries and losses in the artificial and construction terrain. Enter tethered tools. How Do Tethered Tools Function? Tethered tools are generally made up of three fundamental corridor Tether-Ready Tool or Attachment Point Either an erected-in anchor point in the tool (ubiquitous among current tethered tools) or an external attachment analogous to a circle, heat-shrink tether point, or accessory . Tool Tether (Lanyard or Coil) The tether is attached to the tool and the worker or a fixed anchor point. It can be retractile or elastic and generally certified for strength and weight standing. Anchor Point This is where the tool is anchored. It may be a belt circle, harness D-ring, wrist belt, or a stationary workbench. The design enables workers to use tools at liberty while icing these, which remain attached and do n’t fall if dropped accidentally. Types of Tethered Tools and Systems There are numerous types of tethered tools moment, each for various tasks and surroundings 1. Hand Tools with Integrated Tether Points samples screwdrivers, pliers, hammers, and wrenches. These tools are equipped with secure holes or circles for attaching cords directly. 2. Tool Tethering paraphernalia These packages enable you to make your current tools with tethering systems. They contain tethers, accessories , circles, and attachment tape recordings. 3. Retractable Tool Tethers These act as retractable keychains or tape recording measures. They enable the tool to be extended for use and also repudiated when not being used. 4. Wrist Tethers Tools are attached to a wrist belt so workers can work using them without fussing about slippage. 5. Tool Cords Cords are available in multiple lengths, paraphernalia, and weight capacities. They are connected between the tool and a secure body point or structure. Advantages of Tethered Tools Tethered tools are n’t simply a safety necessity; they also enhance worksite effectiveness and professionalism. also is how 1. Avoid Injuries The most striking and important advantage is preventing injuries. Tethering guards against falling tools that could hurt workers and bystanders. 2. Minimize Tool Loss Tools that fall from a height generally ca n’t be easily recovered. Tethering prevents these precious losses. 3. Save Time No need to intrude on work to pick up dropped tools. This maintains the workflow smoothly and effectively. 4. meliorate Compliance Tool tethering is now a demand in multitudinous industriousness as part of their safety compliance. Using tethered tools guarantees you act up with those morals. 5. Boost Professionalism Workers who use tethered tools demonstrate responsibility and perceptivity. This is good for the company’s image and character. Industriousness That Rely on Tethered Tools Tethered tools are a must-have in industriousness where individualities work at heights or near precious and delicate outfits on a regular basis. Some of these industriousness are Construction oil painting oil and Gas Telecommunications Aerospace Wind Energy Manufacturing conservation & Facility Management utility In all this industriousness, tool tethering is an integral part of everyday safety procedures. Tool Tethering Mandatory, Not voluntary Numerous associations, analogous to OSHA (Occupational Safety and Health Administration) and ANSI (American National Standards Institute), have laid out regulations and guidelines for preventing dropped objects. While OSHA does n’t make tool tethering obligatory, it does impel employers to guard workers against falling objects. The ANSI/ISEA 121-2018 standard prescribes criteria and testing for outfits used in dropped tool prevention. It sets up performance conditions and test procedures for Tool tethers Anchor attachments Tool attachments Containers for dropped object prevention Employers and safety directors are increasingly espousing these morals to maintain safe work surroundings. How to apply a Tethering System at Your Worksite still, there also are a numerous pivotal way If you’re planning to introduce tethered tools in your operations. 1. Assess the Work Environment Understand where tool drops are likely to do — working at height, scaffolding, halls, etc. 2. Choose the Right Tools and Tethers All tools do n’t inevitably bear tethering. Give priority to tools employed at height or over important outfits. Use tether types according to tool weight and stir conditions. 3. Train the Workers Perform safety training on how to use tethered tools, how to check for wear and tear and gashes and incisions, and how to tie up tools. 4. Establish examination and conservation Procedures Regular tool examination becomes part of your routine. Directly replace worn-out tethers or damaged anchor points.

When plumbing, the right tools can be the difference between a speedy form and a job you’ll detest. One of the most pivotal tools in any plumber’s magazine is the pipe wrench. Whether you’re a professional or a homemaker, knowing what pipe wrenches are and why they’re so necessary is essential. In this blog, we’ll take a deep dive into what pipe wrenches are, their types, their uses, and why they’re so important in plumbing work. What Is a Pipe Wrench? A pipe wrench is a malleable wrench specifically for gripping and twisting pipes and fittings. In comparison to normal wrenches, the pipe wrench’s jaws are serrated, giving it a firmer grip that bites into the pipe. Due to this special point, one can twist or loosen essence pipes indeed if rust or age stuck them. Pipe wrenches are constructed with heavy accoutrements similar to swords or aluminium, which makes them strong enough to repel the heavy force necessary to grip and turn hard pipes. The handle is generally long to give the stoner less influence. Main Components of a Pipe Wrench Before we go further, it’s pivotal to know the main factors of a pipe wrench Hook Jaw The top jaw is malleable and clamps the pipe. Heel Jaw The lower, fixed jaw. Adjustment Nut Used to move the hook jaw over or down to fit different pipe sizes. The handle provides the influence demanded to turn the wrench and pipe. Each part works together to allow you to fix the wrench onto a pipe securely and turn it without slipping. Types of Pipe Wrenches Not all pipe wrenches are created equal. There are colourful types for different uses. These are the most common types 1. Straight Pipe Wrench It’s the most standard type. It’s used for rotating pipes in regular plumbing jobs. It has a straight handle with jaws that hold round objects. 2. End Pipe Wrench It’s used for working on pipes near walls or in constricted areas. The jaw is slanted to reach tight spots. 3. Offset Pipe Wrench Has an angled jaw and handle. Ideal for fitting pipes in tricky positions or when there’s no space. 4. Emulsion influence Wrench It is specifically designed to put further influence in when opening up veritably tight joints. Has a double-jaw system to offer a fresh grip. 5. Chain Pipe Wrench Rather than jaws, it utilises a chain for belting around the pipe. Excellent for use with oddly shaped pipes or where an ordinary jaw is unfit to catch. 6. Strap Wrench Uses an essence-free strong fabric or rubber swatch rather than essence jaws. Ideal for use on polished, plastic, or soft pipes without causing damage. All have their intended operation, but the straight pipe wrench is the choice for most plumbing work of a general nature. Why Are Pipe Wrenches Necessary for Plumbing Work? Since you now know what a pipe wrench is, let’s go over why the pipe wrench is so necessary for plumbing 1. Strong Grip on Pipes Pipes tend to be smooth and round, so they’re delicate to grasp using ordinary tools. Pipe wrenches feature serrated jaws that suck into the essence, giving a good grip. This makes it fairly easy to twist, strain, or loosen pipes. 2. Adjustability A single pipe wrench can accommodate various pipe sizes. You just move the nut to open or close the jaws, and the tool becomes veritably protean. Whether you’re dealing with a small or big pipe, a pipe wrench can be acclimated to suit. 3. Continuity Plumbing work can be gruelling. Pipes are generally wedged, filled with gravel, or congested with smut. Pipe wrenches are constructed using strong accoutrements that can repel harsh surroundings without breaking or deteriorating quickly. 4. Influence Due to their long handles, pipe wrenches give great leverage. This implies that you can apply a lot of force without important trouble, which makes it simpler to work on wedged or tight pipes. 5. Versatility Pipe wrenches are n’t limited to pipes. You can also use them on couplings, faucets, elbows, and other round fittings. 6. Safety It can be perilous working on pipes using the wrong tool. A right pipe wrench eliminates the threat of slipping, getting hurt, or damaging the pipe. How to Use a Pipe Wrench duly Proper use of a pipe wrench is not only essential for effectiveness but also for safety and the life of your tool. Then there’s a introductory step-by-step companion Step 1 Acclimate the Wrench Open the jaws by rotating the adaptation nut. Place the jaws over the pipe. Ensure the jaws are snug but not too tight. Step 2 Position the Wrench rightly The hook jaw (top jaw) needs to be facing the side you’re pulling towards you. This assists the teeth in settling into the pipe and holding on tight. Step 3 Apply Pressure Hold the handle tight and press down sluggishly but forcefully. Do not use a jerking stir, or the wrench will slip. Step 4 Budge as demanded Still, you might need to budge the wrench every quarter or half turn if you’re turning further than formerly. Common miscalculations to Avoid Although pipe wrenches are easy to use, individuals tend to commit crimes that may beget issues. Some common crimes and how to avoid them are as follows: Using the Wrong Size Wrench: Always use a wrench of the right size for the pipe size. Over-tightening Overtightening can crush the pipe or fitting. Wrong Jaw Position Always set the wrench so that force tightens the grip, not loosens it. Using on Soft Pipes Never use a standard pipe wrench on soft accoutrements similar to plastic without protection — use a swatch wrench. Not maintaining the wrench by cleaning and oiling your wrench on a regular basis to keep it from rusting and wearing out. Tips for Buying a Good Pipe Wrench still, the following are some speedy tips to help you find a good one If you are in the request

When it comes to woodworking, perfection, control, and artifice are crucial to achieving high-quality results. Whether you are constructing new cabinetwork, restoring antique pieces, or performing routine repairs, the tools you use can greatly affect the finish and functionality of your work. Among the numerous tools set up in a carpenter’s toolbox, one that frequently goes unnoticed but plays a vital part is the carpenter’s pincers. Carpenters’ pincers look like another set of pliers at first glance, but they’re actually made for pulling nails, fashions, masses, and other fasteners out of wood without damaging it. Their rounded jaws give them great grip and influence, and you can indeed pull out deeply seated nails fluently. What makes them really special is that they can do this task without ripping, cracking, or dropping the wood face, which is particularly vital when doing work on delicate or precious rustic objects. Due to their effectiveness and delicacy, carpenter’s pincers are used considerably not just by professional woodworkers but also by do-it-yourselfers, cabinetmakers, and restoration specialists. They’re easy to design yet extremely effective and are a must-have in any woodworking bid. In this post, we’ll cover everything you want to know about carpenter’s pincers — how they are constructed, how they are employed, what makes them unique, and why every woodworker needs a good brace in their toolbox. What Are Carpenters’ Pincers? Carpenter’s pincers are devoted hand tools that are substantially employed in woodworking to hold, pull, and remove fasteners like nails, screws, and masses from wood shells. They’ve been a necessary part of woodworking and carpentry for generations due to their plain yet veritably effective design. The characteristic aspect of carpenter’s pincers is that they have rounded, twisted jaws, which are designed to apply a strong grip on fasteners. This twisted shape has a twofold purpose: it not only provides an established grip on the object being drawn but also functions as a pivot point for prying the fastener out of the wood. This influence lessens the quantum of force needed and facilitates the junking of nails and other fasteners fluently, with little peril of splitting or damaging the wood face. In discrepancy to common pliers or nail scullers, carpenter’s pincers are designed to give perfection and control. They frequently have short but robust handles that give a firmer grip and further project, indeed, in confined or awkward areas. The pincer tips can have a blunt cutting edge, which is robust enough to grip or suck lower accoutrements but not sharp enough to cut wood or essence deeply. Due to their durable construction and useful operation, carpenters’ pincers are applied to a variety of tasks ranging from cabinetwork form and bottom installation to restoration and general woodworking. They’re a chief tool for any operation that includes safe and effective junking of nails or manipulation of wedged fasteners without compromising the workpiece. What Are Carpenters’ Pincers Used For Indeed, though they feel like bare absorbing tools on first sight, carpenters’ pincers are largely protean and used for colourful purposes in a wide range of woodworking jobs. They can do fine and demanding work with perfection due to their design, and they’re therefore the first choice for both professionals and do-it-yourself potterers. 1. Nail junking One of the most frequent and significant operations of carpenters’ pincers is nail biting. This purpose is at the heart of why the instrument is so necessary for woodworking and structural systems. Whether you’re taking apart an old point of cabinetwork, stripping bent or misplaced nails, or reacquiring wood from earlier systems, carpenters’ pincers give a neat, presto, and effective way. The twisted jaws of the tool are particularly fashioned to snugly wrap around the head of a nail. After the pincers have established a solid grip, they serve as a fulcrum — applying influence and the twisted head to pry up the nail with minimum strength. This makes the design greatly drop the stoner’s trouble needed while also aiding in the protection of the wood face from unwanted damage. What distinguishes carpenter’s pincers from pliers or claw hammers is the fact that they can grip nails that are incompletely sunk or in near, small spaces where other tools can not fit. This is particularly helpful in operations similar to restoring old cabinetwork or when working in tight spaces similar to corners and joints. Also, pincers enable sensitive control while pulling out nails small or thin enough to use on cabinetry or neat work. This is a minimised threat for unyoking the wood and leaving behind unattractive, big holes. In effect, if you must take nails out without demeaning your material or straining your hands, carpenters’ pincers are the stylish tool with which to get the job done — effective, reliable, and designed for the task. 2. Chief and method junking Carpenters’ pincers are especially handy when dealing with upholstery, panelling, or wood institutions held in place by masses or fashions. The important, twisted jaws of the pincers can slide painlessly under the head of a chief or method so that you can grip it tightly and pull it out with ease. This is why they’re best suited for cabinetwork restoration, upholstery, or any woodworking design where fasteners must be removed without slivering or cracking the underlying material. Pincers offer a clean and controlled junking process as opposed to other tools that will pry or rip at the wood. 3. Bending and Twisting Cables Though secondary to their factual purpose, sturdy sword pincers from excellent-quality carpentry can also prove handy for gentle metalworking trials. These tasks involve bending and twisting thin essences that are generally employed in construction, fencing, or installation services. The material’s establishment clamp and ergonomically structured handles make easy work of dealing with line by creating circles, tensing joints, or conforming pieces of essence on an angle. This makes a brace of pincers the perfect mate on tasks that integrate wood and essence. 4. Gripping Small Objects Stably Occasionally, a carpenter requires a third hand. Pincers of
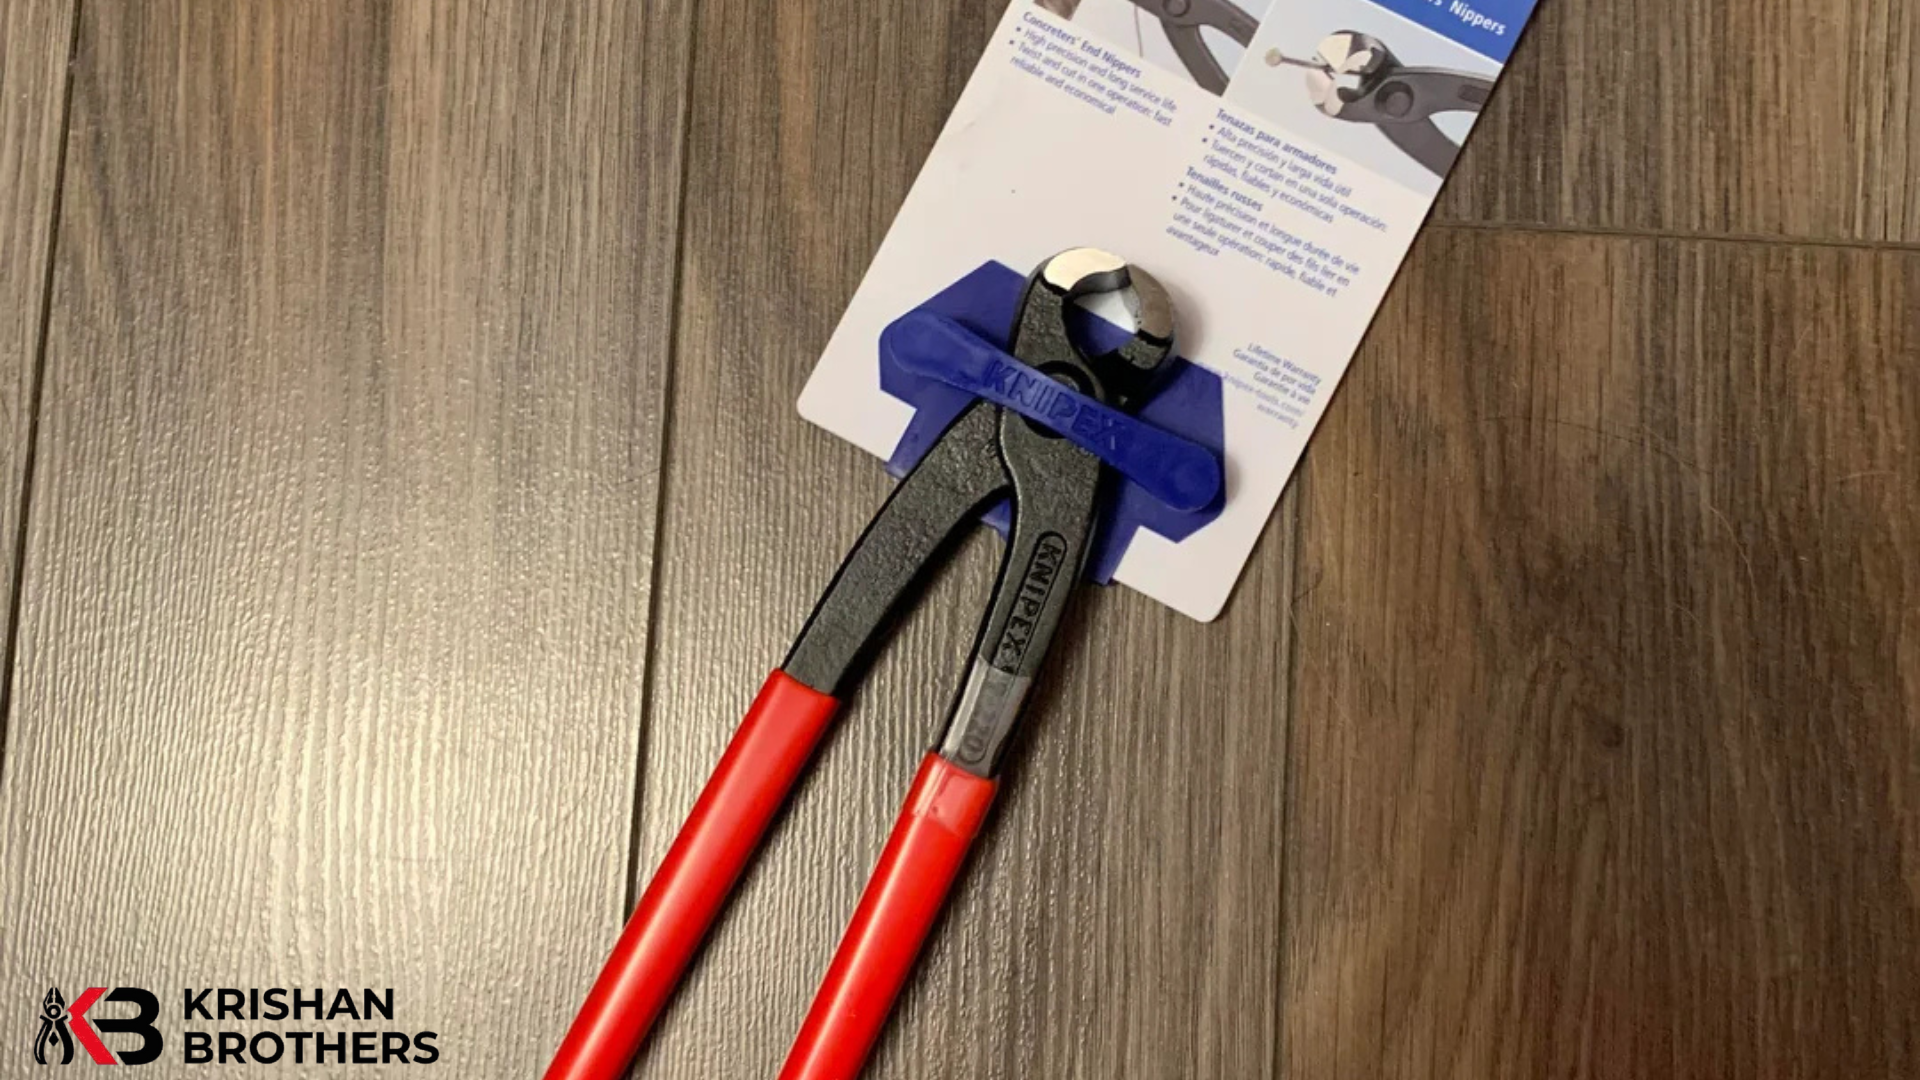
On the construction point, the proper outfit can mean a huge difference in the work’s quality, pace, and safety. One similar necessary piece of outfit that does n’t get the attention it deserves is the concrete workers’ boots. Tying a sword, cutting a line, or tensing mesh—anyhow of the operation, these pieces of outfit are absolute musts for plutocrats on every construction point. Then in this blog, we will bandy about what concrete’ shoes are, how they’re used, their benefits, characteristics, and why they’re simply necessary for anyone who handles concrete or sword underpinning. What are concrete workers’ youths? Concrete’ youths, or tie-line pliers or nipping pliers, are specialised homemade tools generally employed in the construction sector, especially in corroborated concrete. These pliers are especially designed to cut and twist tie line, an important function in fastening sword underpinning bars (rebars) previous to pouring concrete. The crucial function of these biases is to keep the sword mesh or rebar tightly restrained and duly located, which directly impacts the structural strength and life of concrete structures. The Concreters’ Nippers are finagled to repel rough construction conditions. They have a sharp, hardened sword jaw, which enables cutting lines snappily and fairly without rasping and leaving behind uneven edges. A rounded head with phased jaw tips is ideal to fit into compact areas and wring lines tightly against rebar joints. This not only accelerates the work but also increases safety by minimising the possibility of loose line ends sticking out from the structure. Draughted from durable, high-carbon or amalgamation swords, these tools are designed to take heavy use without bending or breaking. Their ergonomic, non-slip grips give a comfortable and secure hold, which is vital when using them for repetitive conduct over extended shifts. Some have a spring-loaded return function, which reduces hand fatigue by resetting the jaws automatically after every cut or twist. Whether on a marketable construction point or bearing lower-scale DIY concrete work, Concreters’ Nippers are a vital piece of outfit in every builder’s magazine. With their straightforward but robust design, they allow for accurate running of lines, smooth workflow, and secure underpinning — making them a must-have for the professional builder. What Are Concreters’ Nippers Used For? Concreters’ boots are extremely protean pieces of outfit used in corroborated concrete construction. They’re primarily employed for the running of tie lines and employed for tying sword underpinning (rebar) previous to concrete being poured. Their value transcends that of just one specific operation, however. Let’s take a near examination of the primary operations of Concreters’ Nippers on point 1. Tying Rebar (Buttressing Bars) Tying rebar, or buttressing bars, is presumably one of the most significant uses that Concreters’ Nippers have in a structural terrain. Rebar is an integral part of corroborated concrete structures. It provides tensile strength to concrete and serves to keep the structure complete in spite of the forces and stresses placed upon it. But for rebar to do its job, it needs to be duly located and held forcefully in place before concrete is placed. This is where youths of concreters work. Sloggers employ Concreters’ Nippers to twist and tie sword line around crossing rebar sections. Twisting consists of belting the line tightly and securely around the joint where two or more bars cross and also pulling and twisting the line using the youths to lock the bars together. When the tie is tight enough, the remaining line is trimmed off neatly with the same tool. This list process keeps the rebar in a stable, well-aligned position during the concrete pour and curing cycle. Indeed, minimum rebar movement can reduce the strength of the structure and put safety at risk, making secure ties imperative. Also, Concreters’ Nippers make this process presto, repetitious, and precise — precious characteristics on a high-volume job point where time and delicacy are consummate. By easing both effective wringing and neat slicing, concrete workers’ youths help sloggers in keeping rebar structures harmonious and strong, eventually leading to safer and more reliable concrete structures. 2. Cutting Tie Wire Accuracy and Safety with Every Snip Cutting tie lines is maybe one of the most critical uses of concrete workers’ youths — a putatively trivial task that actually has a great impact on the overall safety and tidiness of construction work. After securing rebar using a tight turn of line, the redundant length needs to be cut off. Having long or jagged ends can produce significant safety hazards. The exposed bits of line are fluently suitable to scratch, cut, or hitch workers, particularly in high-business and excited construction areas. This is where Concreters’ Nippers really excel. They feature razor-sharp, rugged slice blades that enable one to crop the line near the knot without altering the structural integrity of the tie. They’ve been finagled into giving a flush cut and giving clean cuts without generating any harsh points or an unkempt terrain. As compared to plain side knives or plain pliers, Concreters’ Nippers bring perfection force and use their influence form in order to efficiently cut hardened sword tie lines with ease. Also, their streamlined head design also enables druggies to reach into confined spaces between rebars or mesh, making them particularly ideal in heavy underpinning structures. Utmost youths also feature anti-slip, gentle handles that promote better control while cutting, reducing the threat of hand fatigue or tool slipping. 3. Cutting Mesh and Rebar In every concrete underpinning construction design, rebar (buttressing bars) and mesh sword need to be duly aligned before pouring concrete. These accoutrements comprise the structural frame of crossbeams, shafts, walls, and columns. But while being installed, rebar or mesh can shift a little due to eschewal of position during installation due to movement, dimension miscalculations, or irregular shells. That is when Concreters’ Nippers prove useful — not only to cut and fasten line but also for making subtle, yet essential, changes to the rebar and mesh. The thick jaws and slim profile of Concreters’ Nippers give them emotional influence and gripping power, meaning workers
When most homeowners think of essential tools, they often picture hammers, screwdrivers, or maybe a power drill. But one underrated tool that deserves a place in every household toolbox is the crimping pliers. Whether you’re handling electrical wires, fixing home appliances, or setting up a sound system, crimping pliers can save you time, money, and frustration. In this blog, we’ll explore what crimping pliers are, how they work, and why they’re so important for modern homeowners. By the end, you’ll understand how this one tool can make a big difference in your DIY and home maintenance projects. What Are Crimping Pliers? Crimping pliers, also called crimpers, are tools designed to join two pieces of metal or wire by deforming one or both to hold them together. The crimping process creates a secure, solderless connection, most commonly seen in electrical and networking work. They’re mainly used for: Crimping electrical connectors Attaching terminals to wires Creating tight connections without welding or soldering Crimping pliers come in various sizes and designs, depending on the type of task: Manual crimping pliers for light work around the house Ratchet crimpers for more consistent pressure Hydraulic crimpers for heavy-duty jobs Why Should Homeowners Care About Crimping Pliers? You might be thinking, “I’m not an electrician—why would I need crimping pliers?” Here are 10 solid reasons why every homeowner should own a pair: 1. They’re Perfect for Electrical Repairs One of the most common household issues is faulty wiring or broken connections. Crimping pliers make it easy to: Replace broken connectors Attach terminals to wires Fix light switches, sockets, and small appliances Without crimping pliers, you’d either need to twist wires together (which is unsafe) or call a professional for minor issues. 2. They Offer a Safe, Solder-Free Solution Soldering wires requires skill, a soldering iron, and a safe environment. That’s not always practical at home. Crimping, on the other hand, offers a clean, safe, and effective solution with No heat required No fumes No fire hazards You get strong, permanent electrical connections in just seconds. 3. They Help You Save Money Hiring an electrician for small tasks can cost hundreds. Crimping pliers let you Make minor repairs yourself Install or replace wiring connectors Upgrade or fix electronics at home With a little practice, you’ll avoid unnecessary service charges and keep your wallet happy. 4. They’re Easy to Use—even for Beginners Many tools take time to master. Crimping pliers are straightforward: Strip the wire Insert it into the connector Squeeze the pliers—and you’re done! Even first-time users can get reliable results with basic instructions or a quick video tutorial. 5. They’re Great for Home Improvement Projects Thinking of setting up a home theatre? Installing new lighting? Adding a security system? You’ll likely need to connect cables or wires—and crimping pliers will help you: Connect speaker wires Secure power cables Create custom wiring setups Whether you’re upgrading your home or making it smarter, crimpers are your best friend. 6. They’re Ideal for Automotive Repairs Too Got a car in the garage? Crimping pliers aren’t just for the house—they’re perfect for: Replacing battery terminals Fixing headlight wiring Installing car speakers If you like doing your own vehicle maintenance, crimpers are a must-have. 7. They Provide Strong and Reliable Connections A well-crimped connection is Secure Vibration-resistant Moisture-proof That’s why crimped terminals are used in cars, planes, and industrial machines. For homeowners, this means Fewer loose connections Longer-lasting repairs Safer electrical work 8. They Help with Networking and Internet Setups In today’s connected world, you might need to: Fix a damaged Ethernet cable Make a custom internet wire Connect phone lines or coaxial cables Crimping pliers—especially ones designed for RJ45 or coax connectors—can help you create your own high-quality cables at home. 9. They Make You More Self-Reliant Every homeowner should know some basic DIY skills. Crimping pliers help you become: More independent More confident in home repairs Prepared for emergencies Imagine fixing a broken appliance wire during a power outage—or reconnecting a garden light without waiting days for a technician. 10. They’re Affordable and Long-Lasting You don’t need to spend a fortune. Many good-quality crimping pliers cost less than ₹1000 or $20, and they last for years if maintained properly. It’s a small investment with huge returns in convenience and cost savings. Common Types of Crimping Pliers for Homeowners There are many crimpers out there. Here are a few types that suit most household needs: Basic Electrical Crimping Pliers For spade, ring, and butt connectors Great for wires in lights, switches, and appliances RJ45 Crimping Tools For making Ethernet cables Essential for home internet fixes Coaxial Cable Crimpers For connecting TV or CCTV cables Ratchet Crimping Pliers For consistent, professional crimps Easier for beginners due to automatic release Wire Stripper + Crimper Combo Tools A handy all-in-one tool for stripping and crimping How to Use Crimping Pliers at Home—Step-by-Step Choose the right connector and wire size. Always match the crimp connector to the wire gauge. Strip the wire insulation. Use a wire stripper or the built-in feature on your crimper. Insert the wire into the connector. Make sure no strands are sticking out. Place the connector in the crimping jaws. Align it properly—most pliers have colour-coded slots. Squeeze the handles tightly. For ratchet crimpers, squeeze until the release clicks. Check the connection. Tug the wire gently. If it doesn’t move, the crimp is strong. Maintenance Tips for Crimping Pliers Wipe off dust and debris after each use. Apply a drop of oil to the joint for smooth movement. Store them in a dry place to avoid rust. Don’t use crimping pliers as regular pliers—they’re not designed for twisting or cutting. Final Words: A Small Tool with a Big Impact Crimping pliers may not be the flashiest tool in your kit, but they’re one of the most useful. They combine safety, convenience, and versatility in a compact, affordable package. If you’re a homeowner who values self-reliance, saving money, or simply being prepared, it’s time to add crimping pliers to your
Circlip pliers are a necessary outfit for anyone dealing with ministry, vehicle corridors, or mechanical assemblies. Whether you are a homeowner do-it-yourselfer or an expert handyperson, circlip pliers help with the installation and junking of snap rings, which are referred to as circlips. They might appear easy, but using circlip pliers erroneously can beget tool damage, damaged corridors, or indeed injury. In this blog, we will dissect the most frequent crimes individuals make when using circlip pliers, describe why they do, and give you help with how to help them. By the time you have finished reading this composition, you’ll have the knowledge and confidence to use circlip pliers correctly every time. What Are Circlip Pliers? Before we dive into the crimes, let’s take a brief recap of what circlip pliers are. Circlip pliers are specifically used to work with circlips —small, C-shaped rings that are fitted in grooves in shafts or in dullvilles. These are employed to secure corridors, to help movement, or to lock assemblies together. There are two broad orders of circlip pliers Internal Circlip Pliers — These are employed for fitting or withdrawing circlips from within the dullsvilles. External Circlip Pliers These are used to work with circlips, which are installed around the shafts. Each style is available in straight, fraudulent, and angled forms to fit colourful spaces and uses. Common crimes When Using Circlip Pliers (and How to help Them) 1. Using the Incorrect Type of Circlip Pliers Most people do not know that there are colourful pliers for internal and external circlips. The wrong type can ruin the circlip, the tool, or the element. How to help it Always determine the type of circlip before beginning. Use internal pliers on rings within holes and external pliers on rings around shafts. Some pliers moments have exchangeable heads; if you are using those, be sure you are using the proper configuration. 2. Using Too important Force The error Trying to spread or compress circlips with brute force can distort them, make them go flying off, or indeed break the pliers. How to help it Circlip pliers are erected to take care of the correct degree of pressure. Let the device do its thing. Use gentle, slow, and steady pressure—never yank or shove the pliers. When a circlip gets wedged, apply lubricant previous to trying it again. 3. Not Wearing Safety Equipment The error is neglecting particular protection. Circlips that are slackened can spring back and induce eye injuries. How to avoid it Always use safety spectacles or face shields when dealing with circlips. Still, wear gloves too to help prevent hand slipping if you are doing work in close diggings. 4. Using Worn-Out or Poor-Quality Pliers The error Numerous people make the mistake of using old, cheap, or worn-out pliers that do not grip well or slip fluently. How to help it Buy good-quality pliers with a comfortable grip and spring action. Check for signs of wear and tear — loose joints, fraudulent tips, or lost springs. Replace pliers that no longer operate easily. 5. Using the Incorrect Size or Type Tip The error The indecorous use of pliers tips too large, too small, or incorrect for the circlip. How to avoid it Circlips have varied tip sizes and angles available: straight, 45 °, and 90 °. Fit the tip size and angle with your work terrain and circlip periphery. For atomic clips and electronic operations, employ perfection tip pliers. 6. Not setting the workpiece duly The mistake Working on an unstable or relaxed corridor increases the threat of tool slips or deranged circlip installation. How to avoid it Use a vise or a fix to hold the part in place. Ensure the shaft or drag is clean and free of debris to help the circlip seat duly. 7. Installing Circlips in the Wrong Direction The error Circlips are manufactured to present in a specific way grounded on cargo direction. Placing them backwards lowers their holding capability. How to help it Corroborate the direction of thrust and have the circlip’s flat face orientated towards the force. Consult manufacturer guidelines or schematics for instruction. 8. forgetting examination of Circlips Prior to Reuse The error Using misshapen, eroded, or stretched circlips to exercise them may affect, in part, failure. How to help it Always check old circlips for wear and tear, rust, or bending. Replace any circlip that does n’t fit well or appears damaged. Have a box of varied new circlips on hand for negotiations. 9. Poor storehouse of Circlip Pliers The error Throwing your tools into a box without sorting through them may result in damaged tips, getting deranged, or losing accessories. How to help it Store circlip pliers in a tool rack, froth organiser, or carrying case. Clean and grease them from time to time to help with rust and stiffness. Organise exchangeable tips and label them. 10. Disregarding Manufacturer Instructions The most individualistic individuals overlook the particular use and conservation guidelines that come with the tool or outfit. How to help it Read the tool primer or search online primers if in mistrustfulness. Cleave to the specified necklace limits and part specifications for circlip fitting. Perk Tips for newcomers Exercise on a test part before handling real ministry. Always have an attraction tool on hand to pick up dropped circlips. Do not confuse your internal and external pliers — label them if necessary. Watch many tutorial videos to observe the proper fashion in action. When to Replace Circlip Pliers Occasionally, crimes are not your fault; your tools might simply be too old to serve well. That is when you should suppose about replacing your pliers The tips are fraudulent or worn down The spring action is too loose or too tight The jaws no longer fit together rightly You get constant tool slips A good set of circlip pliers will last for a long time if you look after them, but like all tools, they will ultimately wear out. Final studies Circlip pliers

In today’s world of ultramodern electronics, the quality of signal transmission can either make or destroy the performance of your device. Whether you’re creating a home theatre system, installing network string, or controlling an artificial outfit, there exists one putatively small element that’s so vital to the entire setup — the string connector. Similar plain-looking connectors do a lot more than just retain cables. They’re foremost contributors to the preservation of signal quality and hindrance minimisation. Then, in this blog post, we will bandy about how string connectors enhance signal quality and minimise hindrance, why using the correct connector is important, and how you can guarantee excellent performance from your bias by being apprehensive of this frequently neglected element. What Are Cable Connectors? Cable connectors are pieces of equipment used to connect electrical terminations and form an electrical circuit. They’re made in different shapes and forms, and each is intended for a particular use, i.e., audio, videotape, power, or data transfer. Typical Types of Cable Connectors Coextensive connectors (e.g., F-type, BNC) Audio connectors (e.g., RCA, XLR, 3.5 mm) HDMI connectors USB connectors Ethernet (RJ45) connectors Fiber optical connectors (e.g., SC, LC) Every type of connector is precisely constructed so that accurate signal transmission, minimum loss, and protection against environmental hindrance are guaranteed. How Signal Quality Is Important Signal quality describes the manner in which the data (audio, videotape, or information) is transmitted from one device to another without declination. Bad signal quality can lead to Distorted videotape or dropped audio Slow and unreliable internet pets Data packet loss in networks tackle malfunction or failure Good-quality string connectors are made to avoid these problems and maintain the signal as strong and clean as possible throughout its transmission. How Cable Connectors Enhance Signal Quality 1. Stable and Secure Connection Stability is one of the most pivotal rudiments of signal transmission. Loose or inadequately connected lines may result in signal dropouts or inconsistency. Good-quality connectors are made to fit securely and remain stable, furnishing a harmonious and stable connection. For instance, RCA connectors plated with gold are constantly employed in audio systems since they conduct more effectively and do n’t erode, enhancing signal passage over time. 2. Reduced Signal Loss (Attenuation) Signal loss, or attenuation, is endured when the signal strength weakens with distance or due to inferior connections. Affordable or low-quality connectors tend to be responsible for this issue. High-quality string connectors are constructed from accoutrements similar to bobby pins, gold, or tableware-plated operators, which offer low resistance. This enables the signal to be transmitted through with minimum declination. 3. Protection Against External Interference Electronic signals are prone to external electromagnetic hindrance (EMI) and radio-frequency hindrance (RFI), particularly in areas with high figures of bias or wiring. hindrance can lead to stationary noise in audio Image deformation in videotape Data corruption in digital transmissions High-end string connectors generally come with shielding bias, like essence jackets or antipode wraps, that keeps similar external interferences from snooping with the signal. For illustration, BNC connectors in security systems are made to repel EMI so that videotape can be transmitted easily. 4. More Grounding and insulation Utmost connectors include grounding features to shield against electrical noise and ensure a harmonious current path. Proper grounding also assists in insulation, which prevents unwanted signal imbrication (also referred to as “crosstalk”) between lines. This is especially helpful in professional audio configurations or in data centres where scores of lines pass near each other. 5. Lower Signal Reflection (Impedance Matching) Impedance refers to opposition to the passage of electrical signals. When the impedance of a string does n’t equal that of the connector or device, it’ll affect signal reflection, producing a weaker or misshapen affair. Utmost connector moments are designed with impedance matching. For case 75-ohm RCA or BNC connectors for videotape operation 50-ohm connectors for radio frequency systems Proper impedance matching means that the signal moves in a single direction, unstopped, with no bouncing back or creating noise. How Cable Connectors Cut Down Interference 1. Improved Physical Design Quality string connectors are perfection—finagled. This involves Tight forbearance to avoid any gaps that may permit EMI or RFI to transude in Locking mechanisms for a secure fit (similar to screw-in coextensive connectors) Shielded essence coverings that help external hindrance The physical integrity of the connector has a significant contribution to its resistance to hindrance. 2. Application of High-Quality Accoutrements The quality of accoutrements stationed in connectors has a significant effect on their performance. Connectors with low-cost blends will fail to carry signals effectively and erode, and this contributes to increased resistance as well as hindrance. Connectors with gold, nickel, or tableware plating are more resistant to erosion and give a further harmonious contact face. These accoutrements also help in blocking EMI and RFI more effectively than their cheaper counterparts. 3. Twisted-Brace and shielded cable committee Some string types, like Ethernet (Cat6, Cat7) and coextensive lines, are specifically designed to reduce hindrance. When paired with matching shielded connectors, their performance improves drastically. For illustration STP (shielded crooked brace) lines minimise crosstalk, and when combined with shielded RJ45 connectors, they give better signal integrity in noisy surroundings similar to manufactories or data centres. 4. insulation from Power Lines and Noise Sources Hindrance generally originates from conterminous power lines, fluorescent lighting, motors, and wireless bias. Duly designed string connectors offer physical insulation that keeps the signal path clean and vulnerable to conterminous noise sources. Certain high-end connectors have noise pollutants within them, particularly in HDMI and AV lines, to reduce audio-videotape hindrance. Useful operations Where Quality Connectors are Most demanded 1. Home Entertainment Systems Prevents static on speakers and image deformation on defenses Maintains videotape clarity on high-definition and 4K signals Enhances overall AV experience 2. Computer Networking Guarantees stable and quick internet access Decreases packet loss and enhances download/upload speed Prevents network drops caused by unacceptable string termination 3. Professional Audio Setups Delivers clean, noise-free sound Shuts off signal bleed between instruments and microphones Supports distant audio transmission with minimum loss
These days, everyone wants to get effects done efficiently and simply — particularly when it comes to tools. Whether you’re a home handyman, a professional tech, or simply someone who likes to tinker around the house, you formerly know how aggravating it can be to use multiple tools for colourful tasks. This is where multifunctional pliers step in — one tool that can perform the work of numerous others. In this blog, we will look at why you should change several tools for a single multifunctional plier and how it can simplify your life a lot. What Are Multifunctional Pliers? Multifunctional pliers are handy tools that can do several things. Unlike standard pliers, which generally have one function, such as gripping or cutting, multifunctional pliers have a variety of features. They tend to have line knives, strippers, crimpers, screwdrivers, shanks , bottle openers, and so much more, each in one small tool. Why Are Multifunctional Pliers So Popular? Let’s face it — no one enjoys lugging around a heavy toolbox, particularly when you’re working in confined or isolated areas. Multifunction pliers are getting increasingly popular since they combine a number of tools into one, which makes them a great choice for convenience, portability, and effectiveness. Let’s take a closer look at the reasons why you should switch. 1. Saves Time and Increases Efficiency Then, in the script, you are fixing a loose line, and you have to strip the sequestration, crimp a connector, and screw the commodity down. Rather than making three different tool changes, a multifunctional plier allows you to do it all without stopping. By minimising constant tool changes, you save time, are more focused, and get the job done hastily. This is particularly salutary for professionals who have deadlines to meet. 2. Reduces Clutter and Saves Space A traditional toolbox filled with individual tools can be big, heavy, and hard to organise. Multifunctional pliers exclude the need for carrying multitudinous tools, performing in a more systematised and compact tool tackle. For homeowners, this means less mess in the garage or mileage hole. For professionals, this means lighter tool belts and smaller passages back to the van or factory. 3. Perfect for On-the-Go Repairs Whether you are hiking, boarding, biking, or working at a distant position, it’s impractical to carry a full toolbox. That is where multifunctional pliers are your stylish friend. They are light, compact, and easy to keep in your fund, pack, or belt pocket. In exigency situations, like cutting a jammed seatbelt or fixing an outfit, multifunctional pliers can be a lifesaver. Many of them are indeed TSA-approved, which makes them perfect for a trip. 4. Long-Term Cost-Effective Although a good multifunctional plier will bring further in the morning, it’ll eventually save you a plutocrat in the long run. Rather than copping 8 to 10 colourful tools collectively, you are investing in one product that does everything. Also, having smaller tools translates into lower relief costs and lower conservation. A good multifunctional plier can last you a lifetime with minimum conservation. 5. Stylish for newcomers and potters Still, you may be demoralised by the number of tools out there if you are new to DIY or home conservation. Multifunction pliers give an easy and affordable way in. You do not have to be a professional — most everyday jobs similar to tensing bolts, stripping line, slicing, etc., can be fulfilled with a single tool. It’s a confidence builder for beginners to learn to do it themselves without being buried in a mound of tools. 6. Great Versatility for Multiple Uses Multifunction pliers are n’t only for DIYers or electricians; they’re also used in construction, automotive form, camping, cycling, fishing, exigency accoutrements , and indeed the service. Take a look at some common uses then Electrical Work—cutting line, stripping line, releasing Household Repairs — gripping, tensing screws, gates repairs Camping and outside — cutting rope, can opening, gear form Automotive Work—tensing battery outstations, exigency repairs Survival Accoutrements cutter, saw, screwdriver, fire-starting function 7. Strength and continuity in One Indeed, though they’re small, multifunction pliers are extremely tough. They’re generally constructed from high-quality, pristine stainless steel or carbon steel, both of which are resistant to erosion and wear. Good manufacturers also give ergonomic designs with rubberised grips for enhanced control and comfort. They’re designed to last through harsh conditions and frequent use, therefore being reliable indeed in harsh surroundings. 8. Enhances Safety Carrying multiple tools increases the threat of dropping or losing them, which can lead to injury or accidents, especially when working at heights or in dark, cluttered spaces. Multifunctional pliers minimise tool switching, which reduces distraction and lowers the chance of injury. Some models indeed come with locking mechanisms that ensure each tool stays safely in place when not in use. 9. Customization and ultramodern Features Contemporary multifunction pliers are not simply biased; they are intelligently biased. utmost of them have features similar to One-handed operation enabled by spring-loaded mechanisms Applicable corridor similar as blades and knives for cables glamorous screwdriver bit heads Light-emitting diodes to illuminate dark surroundings These supplementary features ameliorate mortal experience and come to respond to changing conditions. 10. Eco-Friendly and Minimalist Approach For a sustainable and minimal life, multifunctional pliers are perfect. Having smaller tools means lower material destruction and packaging. You also circumvent the eco-price of creating, transporting, and disposing of single tools. Picking a single multifunctional tool reduces consumption, yet you have multiple functionalities, making your life indeed more sustainable. Effects to suppose Through Before Shopping In order to maximize what your multifunctional pliers can offer, keep these details in mind Figure Quality—A hardened, pristine sword or high-carbon sword is stylish. Essential Features — Include tools you authentically need. Brand Character — Recommended brands are Leatherman, Gerber, Victorinox, and Stanley. Ergonomics — Ease of use and a good grip are pivotal, particularly with longer tasks. Portability—small size and carrying case as a plus point. Locking Medium—Prevents the tools from sliding during operation. Multifunction pliers are not only an accessible tool — they
Electrical work — whether you’re an educated electrician, a handyperson, or simply a person who wants to tie a loose line — line strippers are among the most important tools you can find in your tool exfoliate. Having a line stripper is one thing, but using it neatly and with maximum effectiveness is another. In this detailed, step-by-step companion, we’ll take you through the process of using line strippers like an expert, bandy the colourful types of line strippers, offer safety guidelines, and identify common miscalculations to steer clear of. Once you’ve read this blog, you will feel comfortable working with line strippers on any home or business design. Table of Contents What Are Line Strippers? Types of Wire Strippers When and Why You Need Wire Strippers crucial Features to Check Out Step-by-Step Instructions on How to Use Wire Strippers Tips for Staying Safe Using line Strippers miscalculations to Watch Out For Tips from the Pros for royal, Effective line Stripping 1. What Are Line Strippers? Line strippers are homemade tools for stripping the sequestration on electrical cables. They uncloak the essence core of the line to allow it to be connected to outstations, other cables, or bias. The device is fashioned to neatly trim through sequestration without harming the underpinning captain. Whether you’re installing a light fixture, fixing an appliance, or erecting an electrical circuit, wire strippers make the job brisker, safer, and more precise. 2. Types of Wire Strippers There are several types of line strippers, each designed for specific operations. That’s a quick rundown Homemade line Strippers These are simple line strippers that have notches for colourful line needles. You choose the applicable size, place the line, close the handles, and pull. Automatic line Strippers These are sophisticated tools that acclimate automatically to the line size and strip the sequestration in one squeeze. They’re hasty and more accessible, particularly for professionals. tone-conforming line Strippers A type of automatic line stripper that can be acclimated to different line sizes without the need for homemade adaptation. All-in-One line Strippers These are equipped with other features similar to crimpers, knives, and pliers, which make them a multi-purpose tool for different electrical tasks. 3. When and Why You Need Wire Strippers You must wear lineman strippers whenever you are dealing with electrical cables. Below are some common situations Installing new electrical outlets or switches Fixing damaged line connections Repairing or assembling electronic devices Rewiring home appliances Automotive electrical system work Having the proper line stripper guarantees Accurate sequestration junking No line core damage More quality connections Effective and safer work 4. Main Features to Seek in Wire Strippers Before we dive into how to use them, let’s learn about what makes a quality line stripper Multiple Hand places To handle cables of different density Sharp Blades For making clean, accurate cuts Comfortable Grip Particularly precious for extended work hours Integrated Cutter/Crimper Convenient for multifunctionality Strength Opt for tools constructed with hardened steel or erosion-resistant material 5. Step-by-Step companion to Using Wire Strippers like a Pro Let’s divide the process into way so it’s really easy to work through Step 1 Determine the Wire Gauge Prior to stripping the line, corroborate the line size or hand (generally marked on the sequestration). Still, most line strippers contain hand places that are pronounced, and you can try a test fit if doubtful. Step 2 Choose the Proper Notch Select the proper notch on your line stripper that corresponds to the line’s gauge. However, this step is gratuitous if using an automatic or tone-conforming type. Step 3 Take the Strip Length Utmost line connections bear a particular length of exposed line. Generally, it’s about 1/2 to 3/4 inch. Measure it using a ruler or the tool’s markings. Step 4 fit the Wire Insert the line into the proper notch and position it against the measured length. Ensure it’s straight and held forcefully. Step 5 Squeeze the Handles Carefully and forcefully close the stripper handles. You’ll begin to feel the sequestration being cut but not the bobby core below. Step 6 Remove the sequestration Carefully twist or pull the tool off to strip down the sequestration neatly. However the sequestration comes off, it will leave behind the bare bobby core if this is done right. Step 7 Check the Wire Check to make sure the bobby pin is n’t nicked or bent. A clean strip is needed for proper electrical conductivity. 6. Safety preventives While Using line Strippers Safety first. Below are important tips to observe Always remove power before handling any electrical line. Use insulated gloves when handling unknown or live circuits. Keep your tools dry and clean to help prevent slipping or rust. Use the applicable tool for the task —don’t use scissors or shanks as a cover. Store line strippers rightly to maintain the blades in good condition and safely. 7. Utmost Common miscalculations and How to help Them Indeed, long-time druggies commit these miscalculations. Then is what to look out for Incorrect Use of Wrong Hand Notch This may leave sequestration on or hurt the line. Always use the line with the proper notch. Stripping Too important or Too Little Too important, bare lines can beget films; too little may not fit well into outstations. Nicking the Bobby line This reduces the strength of the line and may beget breakage or reduced conductivity. Applying Excessive Force Let the tool handle it —don’t apply too much pressure. However, make sure you are using the correct notch or the blades are worn out if it’s delicate to strip. 8. Pro Tips for Clean, Effective line Stripping Want to level up your chops? Give these tips a pass Exercise on Extra Cables Still, practice using some spare cables first so you can get the hang of it if you’re a freshman with line stripping. Mark Your Cables When working with more than one line, label them when stripping to help with confusion when reconnecting. Use a Wire Gauge Tool This accessible tool informs you of the precise size of any line


